I saw Fifty Shades Freed in a theater by myself on a Tuesday night because I’m a grown lady, and I do what I want. It was immensely entertaining and easily worth whatever portion of my $10/month movie subscription it gets. It is a brilliantly incoherent movie made up of random bits of schizophrenic movie interspersed between sex scenes.
Cheese Board Collective’s Potato Bread

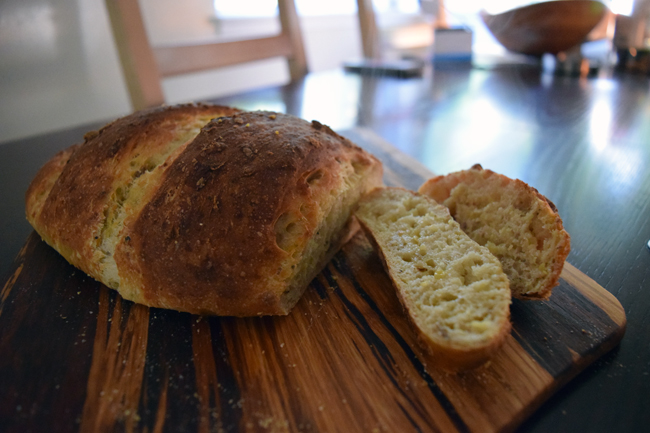
Also known as, a bread worth waiting for (one hopes).
I had a dream last night that I used this exfoliator (it looked like the non-business side of a spiralizer/large pencil sharpener) that made my face *~* glow *~*. I woke up and successfully made breakfast and went swimming until I remembered my dream. Washing my face in the shower, I thought, “Wait, why am I not using my new exfoliator that looks like a huge pencil sharpener?” and then immediately realized how uncomfortable that would be. This is one of the things that is happening now that I’m nearly 30; I dream about skincare and wake up deeply disappointed that this miracle product doesn’t actually exist.
It makes me nostalgic for college, when I would dream of sandwiches! I mean, I still dream of sandwiches, but they are more daydreams than nightdreams. My college-time sandwich dreams were usually related to this bread. I’d make loaves and loaves the night before these big house dinners we’d have, and in order to keep them safe from drunk, hungry, grabby hands late at night, I’d store them in my room. It made my room smell like the inside of a baguette, and I could not even be in there because I’d just want toast constantly. I’d dream of sandwiches all night long.
This bread is a huge crowd-pleaser and is worth the slight fuss of cooking the potatoes, which can be done in advance if you want. It’s salty and peppery and hugely puffy without losing any satisfying bite. The potatoes help keep the inside moist. I often recommend it to new bread bakers because it always delivers. Even though I’ve been trying my damnedest to get a nice, complex sourdough, my friends/forced receivers of leftovers sometimes wistfully/pointedly wonder, “Are you ever going to make that potato bread, again?” I did.
Potato Bread
From The Cheese Board Collective Works. I love this book so much. I lost my first copy, I think because I lost track of who was borrowing it, and I bought another one. Even on my second copy, it’s my most-loved cookbook with stains, watermarks, and bookmarks throughout — super unusual for me because I’m quite obsessive about keeping my books clean. That’s how much I love these recipes.
2 large potatoes (preferably russet)
1 tablespoon plus 1/2 teaspoon active dry yeast
1/4 cup warm water
4 cups bread flour (or 3-3/4 cups all-purpose flour and 1/4 cup wheat gluten)
1 Tablespoon plus 1/2 teaspoon kosher salt
2 teaspoons coarsely ground black pepper
1 Tablespoon olive oil
1 1/4 cups lukewarm water
Cornmeal for dusting the pan
Preheat the oven to 425˚ F. Prick a few holes into each potato with a fork and lightly coat with olive oil. Wrap the potatoes in aluminum foil and bake until soft, usually 45 minutes to an hour. Allow to cool slightly (cut them in half or quarters to expedite this) and shred using the coarse side of a grater. You can do this a day or two in advance.
Proof the yeast by mixing it in with the lukewarm water. Mix the flour, salt, and pepper in a large bowl. Add the yeast/water mixture and the oil and mix until the ingredients are roughly combined and the dough is shaggy. Sprinkle a little flour on a flat surface and dump the dough out, kneading until the dough is soft and slightly shiny.
Flatten the dough out into a large round and dump the grated potatoes onto the dough. Knead gently and briefly to incorporate the potatoes. Leave large pieces of potato in the dough if possible. Drizzle a little oil into a large bowl, gently form the dough into a ball, and place into the bowl, rotating it slightly to cover with oil again. Cover with a damp towel and let rise until doubled in size, usually about an hour.
Preheat the oven to 450˚F.
When the first rise is done, split the dough into 2 equal-ish pieces. Prepare one large baking sheet by sprinkling liberally with cornmeal. Form them into loaves. I prefer to make freeform rounds, but loaf pans work well, too. To make a freeform loaf, shape the dough into rounds and start pulling the dough from the top to create a taut surface, pinching the dough at the bottom of the round. Place gently onto your prepared pan and make a few slices (less than 1/2 inch deep) to help the dough rise. Cover again with a damp towel and let rise for 45 minutes.
Once the dough has risen, prepare a steam bath for your loaves. Place 1/2 cup of cold water and 1/2 cup of ice cubes into a metal baking pan. Seriously, use a metal one. I exploded a Pyrex pan doing this in college. Gently place the baking pan in the oven, followed immediately by the loaves, and close the oven. The good people at the Cheese Board recommend doing the steam bath again in 5 minutes, but I usually skip this step.
Bake the loaf for a total of 45 minutes until they are golden and sound hollow when you tap on them.
Allow the loaves to cool as much as you can wait until slicing in.
Stuffed Artichokes
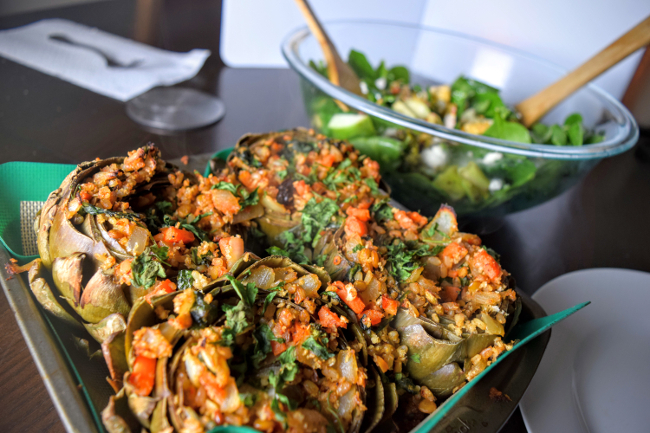
I had a whole thing going about “stuffed artichoke hearts” for Valentine’s Day, which I thought was going to save me from not having actually prepared anything thematic for today. Then I realized that you don’t actually stuff the hearts, you stuff the entire ‘chokes. And there might be a slightly less G-rated themed post about stuffing, but I can’t figure out a way to make those jokes without putting us all off of eating the artichokes. Which, why would we do that? Artichokes are delicious.
So, yeah, I’m less prepared than my delightfully adorable yoga instructor this morning who did a “heart” themed class, and also less prepared than the decidedly sassy but practical instructor yesterday who did a hip themed class. (I promise, those are the only two times I’ve been in the last few weeks; I’m still your friendly, mostly inflexible blogger.) My Valentine’s post has to do with stuffing a food that may have a part that’s called a heart, but there’s an unromantic amount of carnage and a surprising amount of hair involved, so we’ll just leave it unthemed, shall we?
I’ll also be honest — stuffing the ‘chokes was fun and festive, but half the time, I sort of wished I hadn’t bothered and was eating plain chokes with the stuffing on the side. None of the hip bloggers actually stuff their turkeys anymore, right? So maybe artichokes are next. In any case, I wouldn’t blame you if you served them separately, mainly because then you can eat the artichoke leaves with mayonnaise– I mean aioli, or good old melted butter. Both the artichokes and the stuffing are very good, and together they’re a pretty plate, so I’d say, stuff them for the vegetarian dinner party centerpiece, but leave them separate for your weeknight dinner.
Spiced stuffing
2 cups of cooked rice and lentils, in whichever proportion you like
1/2 large onion
2 cloves of garlic
1 large carrot
1 handful baby spinach
1/2 cup panko
1 Tbsp cumin
1 tsp garam masala
juice from one lemon
pinch red pepper flakes (optional)
I had some leftover stuck-pot rice (spicy edition) so used that as my cooked rice and lentils, here. I’d say any grain and/or pulse mixture would work out fairly well, though larger beans might not fit into the crevices of an artichoke very well.
Dice the onion and carrot, and mince the garlic. Heat up a bit of oil in a skillet and fry the onion, garlic, and carrots until soft. Add the spices and red pepper flakes midway through, and reduce the heat to medium. Add the cooked rice and lentils and stir gently until heated through. Turn off the heat and add the spinach, incorporating into the warm mixture until the spinach wilts. Add in the panko/breadcrumbs and stir just to combine. Sprinkle with lemon juice.
Stuffed artichokes
Adapted from The Kitchn
4 artichokes (medium-sized)
spiced stuffing, from above
handful of chopped parsley
Trim the artichokes by cutting off the stems and sawing off the top inch or so of each artichoke. Set the artichokes, stem side down, in a large pot and fill pot midway with water. Add salt to water and bring the artichokes to a boil, covering the pot, for 30 minutes.
Preheat oven to 400˚F.
Let the artichokes cool until you can comfortably handle them. Now we’re going to remove the hairy “choke” part of the artichoke so you can just get to eatin’ at the dinner table. Start by carefully plucking out the pale leaves in the center of the artichoke. Keep plucking until you see the hair layer. At that point, use a small spoon to carefully scrape away the hair, trying not to remove too much of the tender heart.
Repeat with remaining artichokes.
Fan out the artichoke leaves slightly and arrange in a pan. (Loaf pan works well for two, and a small square pan works well for four.) Scoop in the stuffing, working it into the gaps between leaves.
Bake in your preheated oven for another 20 minutes or so, until the bottom leaves of the artichokes are detachable with a gentle tug.
Garnish with parsley.
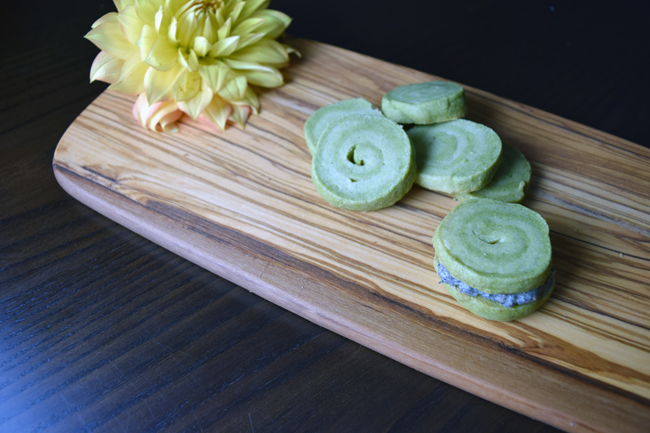
Matcha Black Sesame Sandwich Cookies
Hello from my Chinese-American family — we’re waiting for Beyonce to come on at the Superbowl halftime before we (well, my mom) starts preparing a Lunar New Year dinner of fish three ways: steamed whole, seared fillet, and sashimi. So lucky to have the ocean in my belly, tonight.
Other things I’m doing for the festivities: wearing my red Madewell pants, which are both soft and stretchy — great for the coming feast, catching up with an old friend and thinking I might actually get back into dating this year (I get to count the lunar year as a new one), and trying to write another blog post.
Yes. I’ve been a little preoccupied with work and life and a little struggle with work / life balance, but I’m fighting my way back! And now, with more baking, because I’ve rediscovered the joys of bringing sweets to work. Oh, to work at a place without unlimited cookies — a food blogger’s dream! I know, I’m so, so spoiled.
I made these little Asian Oreos a while back, and I liked them so much that I knew I had to get rid of them immediately. I’m a sucker for anything matcha and anything black sesame, so, naturally, I decided to combine them into the sandwich cookie of my dreams. Matcha and black sesame are like my peanut butter and jelly (though I do love me some PB&J), so these were a winner for me, easily.
I used a recipe for matcha shortbread from Two Red Bowls and black sesame buttercream from My Name is Yeh to make these little bite-sized treats. Baked goods always get bonus points if they can survive a little jostling in my bike panniers so I can bring them to work.
Matcha Shortbread
from Two Red Bowls, adapted slightly
We’ll make two batches of dough — one in light green, and one in dark green, to make the swirl effect. I suggest actually differentiating the matcha powder a bit more than I did, since my swirl effect is quite faint.
Light green layer:
1/4 cup (1/2 stick) salted butter, at room tepmerature
3 Tbsp powdered sugar
1/2 egg yolk
1/2 cup all-purpose flour
1/2 tsp matcha powder
1 pinch of baking powder
Dark green layer:
1/4 cup (1/2 stick) salted butter, room temperature
3 Tbsp powdered sugar
1/2 egg yolk
1/2 cup all-purpose flour
1 tsp matcha powder
1 pinch of baking powder
First, the light green layer (to avoid darkening it with the dough from the dark green layer): Cream together the butter and sugar using an electric mixer until fluffy, and then mix in the 1/2 egg yolk. In a separate bowl, mix together the flour, baking powder, and matcha powder. Add the dry ingredients gradually to the butter/sugar/eggs, beating between additions. The dough will form a dense ball. Smooth out the ball of dough, wrap in saran wrap, and refrigerate.
Follow the same instructions above for the dark green layer.
You can prepare the doughs ahead of time (up to a few days) if you want, or you can roll them out immediately.
To roll out, sandwich a ball of dough between two layers of saran wrap and roll into roughly equal rectangles. I used a small cutting board as a proxy for the size I wanted the dough (about the same size as a 8.5″ by 11″ sheet of paper).
Carefully lay one rectangle of dough on top of the other, and then roll up, short side to short side, like a cinnamon roll. Wrap the log and stick back in the refrigerator to firm up, for at least an hour.
After an hour, preheat your oven to 350˚F. Remove the log from the refrigerator and slice into thin rounds — 1/4 inch, or thinner if possible. Arrange on a silicon or parchment-lined baking sheet; close is okay, since they won’t spread much.
Bake for about 10 minutes, until the edges are browned.
Black Sesame Buttercream
from My Name is Yeh, slightly adapted
1/2 cup (1 stick) salted butter, room temperature
1 cup powdered sugar
2 Tbsp toasted black sesame seeds
1/2 tsp vanilla extract
Grind your black sesame seeds into a paste. I used the coffee grinder that I use to grind spices… which actually gave my frosting a hint of Sichaun pepper. I kind of liked it.
Use an electric mixer to beat together the ingredients and set in the refrigerator to chill.
Assembly — wait until the cookies have cooled completely and the frosting has chilled for ease of assembly. :) The cookies transport the best when slightly frozen.
Takoyaki (Ika-yaki?) Waffle

Things I’ve made in my waffle iron: waffled tofu (good!), falafawaffle (fail!), sweet potatoes (yum!) greens waffle (surprisingly good!), hash browns (obvi good!), cashew oat waffle.
Things I haven’t made in my waffle iron: normal waffles
And, now, we can add these squid waffles. It’s my take on the Japanese octopus balls, takoyaki — which are divine and made in a heavy pan with half-sphere holes in it, turning the batter with bamboo sticks. It’s awesome to watch, and they’re obviously delicious. But, apartment living makes it slightly hard for me to justify buying a takoyaki grill (yet), so the waffle iron seemed like the next best thing! And, it’s much easier. No fiddling around with bamboo sticks, anyways. I think “tako” means octopus, so it’s not strictly correct to call my version “takoyaki” even if we ignore the untraditional shape. I used calamari from our seafood CSA, so I’ve tentatively named this ika-yaki?
I enjoy strolling the somewhat mystifying aisles of the Japanese grocery store, so I used a takoyaki mix. There’s a recipe for the mix on i am a food blog that looks legit without using yamaimo (which sort of intimidates me), though, if you don’t want to go buy a mysterious bag of probably flour, salt, and baking powder. But I don’t recommend you skip the mayonnaise and the sauce! As always, the toppings are the best part.
Takoyaki / Ikayaki Waffle
1 serving of takoyaki flour (mine was 4 oz)
+ whatever the package says you need (mine was 1 1/2 cups water and 2 eggs)
1 lb calamari, cleaned and sliced
1 bunch of green onions
takoyaki sauce and Japanese mayonnaise
furikake / bonito flakes
Slice your green onions thinly. Prepare your takoyaki batter (it will be quite thin) and add in 1/2 the green onions. Reserve the remaining half for toppings.
Heat up your waffle iron! Turn the heat to high, if you have such a setting.
When the waffle iron is ready, give it a quick spray with some nonstick oil. Pour on a small amount of batter — probably about 1/3 a waffle’s worth. (For me, this is just under 1/4 cup.) Quickly distribute pieces of calamari evenly on the waffle. Pour on a bit more batter, then close the waffle iron. Cook until the waffle iron deems the waffle done.
Top with takoyaki sauce, Japanese mayonnaise, and furikake.