Sandwich Cake

0411_sandwichcakewhole
0411_sandwichcakeing   0411_sandwichcakecandle
0411_sandwichcakehalf

Notably, sandwich cake is not the same as cake sandwich.

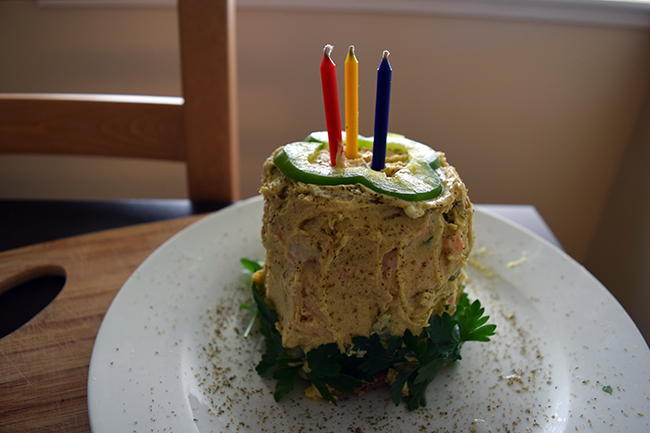
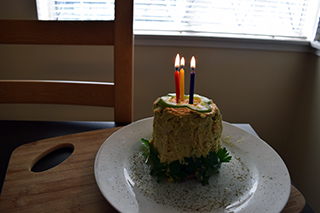
For mysterious and unknown reasons, a certain roommate of mine does not really like normal cake. (I know. This is what I have to live with.) Luckily, we do share an enthusiasm for bread and a distinct lack of enthusiasm for raucous birthday revelry. So, I decided to commemorate his birthday with a silly little “cake” made of bread and sandwich-esque fillings, frosted with hummus, dusted with za’atar. It tastes like a veggie sandwich, albeit a messy one. With vegetable garnishes and some nostalgic candles, it could masquerade as a cake from afar (it’d have to be pretty far, though).

I used my slightly fussy recipe for the smoothest, stickiest hummus I know how to make, some spongey and hearty whole wheat sourdough, and chopped peppers and lox for the layers. Frosting a cake is not my strong suit to start with, and, well, hummus doesn’t make it any easier, so sandwich cake might come out a little “rustic” looking. It’s okay. Points for originality and effort more than make up for it.

And, yes, sandwich cake is darling and silly and all, but I say next time we conquer the cake sandwich!

Hummus (smoothest and stickiest)

1 cup dry chickpeas
pinch of baking soda
1 or 2 cloves garlic
1/2 cup olive oil
1/2 cup tahini
1/2 lemon
salt & pepper to taste

Day before:
Soak the chickpeas overnight in plenty of water. (Normally I’m totally on board with canned beans, because ain’t nobody got time for that, and by that, I mean soaking. But in this specific case, dried is better, since we are going to cook them in a specific way. Sorry. I said it was a little fussy.)

Day of:
Cook the chickpeas with a pinch of baking soda and a generous pinch of salt until they are soft. The baking soda helps to break down the skins of the beans, which gives you a whisper-smooth hummus without the pain of individually “peeling” the beans. I’m crazy, but I don’t want you to have to individually pop chickpeas out of their shells, especially if you eat as much hummus as I do.

Note — I cook my beans in the pressure cooker, which is a lot faster. I set it for 13 minutes under high pressure with the baking soda, salt, and a small drizzle of oil, which works like a charm. This is a great use for the pressure cooker, since it’s a recipe that forgives if the beans are overcooked a bit.

Drain the chickpeas and let cool slightly.

Use a food processor or high-power blender to blend warm chickpeas, garlic, olive oil, tahini, and lemon juice. Add salt and pepper in stages to taste.

Serve immediately if possible, arranging a well in the middle and pouring additional olive oil in. Optionally, sprinkle with za’atar.

… or you could frost a “cake” with it. For optimal frosting texture, do not add the additional olive oil.


Sandwich Cake

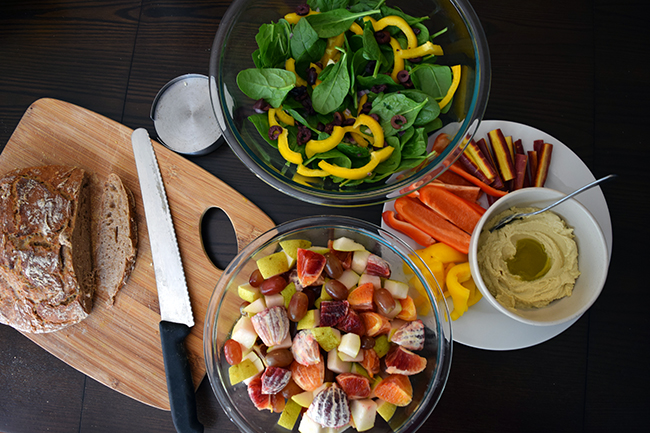
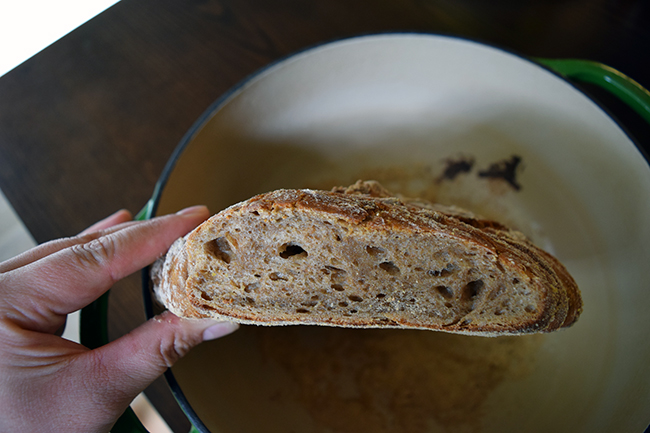
1 loaf of whole wheat sourdough
1/2 recipe of hummus (above)
1/4 cup greek yogurt or cream cheese
1 large slice of lox
1 bell pepper or cucumber
misc green herbs for decorating
za’atar

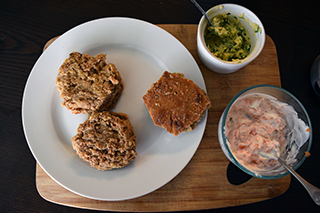
Carefully cut 3 circles from the loaf of sourdough, roughly 3″ in diameter. Trim so they are as flat and uniform as possible, making sure that each piece has at maximum one side that’s crust (so at least one spongey/soft side). Wrap in plastic wrap and refrigerate while you prep the other ingredients.

Mince the lox, combining with greek yogurt or cream cheese, adding additional salt and pepper if desired.

Mince the bell pepper (or cucumber, or whatever) and combine with 1/4 cup of the hummus.

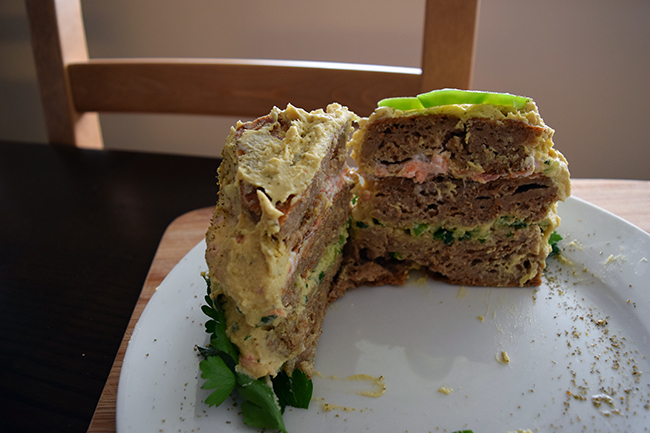
Assemble the “cake” by placing one layer, crust down, then arranging the hummus and vegetable mixture on top. It should stick fairly well to the spongey side.

Carefully place another piece of bread on top. This middle layer will ideally have 2 spongey sides, but if it has a crust side, face the crust side down. Push down gently to adhere.

Arrange the lox mixture on top carefully. Carefully place last piece of bread on top, spongey side down. Gently press down to adhere.

Using the remaining hummus, carefully (but confidently!) “frost” the cake. I started with a big dollop on the top and then did the sides in sections, but to be honest, I’m pretty crap at frosting even normal cakes. Just slather it on, and if pieces of filling poke out, pretend like it’s on purpose.

Decorate with green herbs, extra vegetables, etc, and sprinkle with za’atar to finish. Top with candles (you might need to use some force to poke them through the crust), and celebrate!

Collard Green Tempeh Wraps

0410_collardgreenwrapsing
0410_collardgreenwrapsboard   0410_collardgreenwrapshand
0410_collardgreenwrapsclose

I’ve been staying up late, begrudgingly (and very slowly) doing my taxes, because, hello, mid-April, when did you come around? The thing I’ve come to realize about adulting is that it is just constantly having your butt kicked. There is no mastery of adulting, because once you’ve got one thing figured out, more clamor for attention. It’s like, come on, I already 1) returned my regretful online purchases, 2) cleaned the bathroom, 3) avoiding yelling of obscenities at work, and now I need to remember my student loan login password? What am I, some sort of wizard?

But hey, here’s a thing to eat that’s deceptively fancy. You’ll be able to tick off, “Ate vegetables” from your daily adulting to-do list and be on your way to figuring out whether “tax withholding” is a verb or a noun, all in 20 minutes or so. Or, you could take a break and use all that saved time to play a couple Candy Crush levels; I would aggressively not judge. Because I may have done that.

Collard Green Tempeh Wraps

Per wrap:
A few slices of tempeh
1 small radish
1 small carrot
handful of bean sprouts
2 large collard green leaves

vegetable oil
1/4 cup rice vinegar

Super quick peanut sauce:
2 teaspoons peanut butter
1 teaspoon rice vinegar
1 teaspoon soy sauce
1/2 teaspoon honey or other liquid sweetener

Grate (or use a julienne peeler for the aesthetic pictured above, but grating is totally fine) the carrot and thinly slice the radish. Set in a small bowl and pour rice vinegar over, adding water if needed to let them be just barely submerged. Let them quick pickle while preparing the rest of the ingredients.

Heat a bit of oil in a pan and place the tempeh slices in once the pan’s hot. Let them hang out and brown, peeking back regularly to make sure they are not burning. Flip when necessary, and drain on a paper towel when they are done.

While the tempeh is cooking, whisk together the peanut sauce ingredients in a small bowl, adjusting to taste.

Clean the collard green leaves thoroughly. Slice the stems out and arrange on a plate, former-stem-sides facing in, towards each other. Arrange a small handful of bean sprouts, a bit of the carrot, and radish, and a few slices of tempeh on top. Drizzle with the peanut sauce and wrap (like a burrito, sides inwards, and then roll toward you). You can use a toothpick to keep the wraps together, or… after photographing this one, I, at least, chose to just eat them immediately after assembly.


Book Club Brunch

0314_bookclubbrunch
0314_bookclubbread

Ain’t no party like a book club party because a book club party is… filled with snacks (+ champagne), partially literary discussion, and populated entirely by ladies?

But for serious, being behind on our current book aside, I’m embracing the book-club-attending, food-blogger-aspiring sort of life I’m living these days. There’s nothing quite so satisfying as politely declining a raucous hangout because you are behind on your book club book. Lean into it. Become one of us. Turn pages, not heads. (But also turn heads, because people who like books are also astonishingly good-looking, I’m pretty sure that’s science.)

Clockwise, from the top — spinach salad with bell pepper and olives, hummus (the recipe I think I’m finally settling on! post coming soon) with crudite, fruit salad with pears, blood orange, and grapes, and whole wheat sourdough.

That sourdough, you guys… It’s been a bit of a saga for me, from figuring out how to make sourdough actually rise, to making it taste actually sour, to now trying to avoid white bread. I’m pretty satisfied with this incarnation, though, full disclosure, the second time I made it, I didn’t sufficiently flour the Dutch oven, and it went badly. I had to excavate the bread out like the paleontologist I aspired to be as a child.

The thing about this bread is that, while it’s pretty hands-off and easy, it takes some significant time and planning. It’s part of the whole persona of staying in so you can tend to your growing loaf that you are making for a literary event several days from now. It’s fine; people will understand. Or, at least, I would.

Whole Wheat Sourdough
Adapted from The Cheese Board: Collective Works, Mark Bittman, and Jim Lahey

1-1/2 to 2 cups of sourdough starter*, invigorated for use**
2  cups whole wheat flour
2  cups bread flour
1 tablespoon salt
2 cups water
extra flour, cornmeal, or both, for handling

And, you’ll need a 6-8 quart oven-safe vessel that you can also cover. I use a Dutch oven.

*Don’t have a sourdough starter, you say? I used the exact instructions from The Cheese Board: Collective Works to harvest mine from the air. It is a great book with detailed but still achievable instructions. I won’t reprint the entire excerpt here, but the general gist of it is that I started with 3/4 organic rye flour and 1/2 cup of water, letting it sit out loosely covered for a couple days. Then, I added 2/3 cup of bread flour, and let it sit out for another day. After that, for a week or two, every 24 hours, I lovingly “cycled” the starter by discarding all but 1/4 cup, and adding 1/2 cup of water and 2/3 cup of bread flour. I mixed it up, sometimes, adding wheat flour, which I read has more nutrients for the yeast. Some authors (cough–Peter Reinhart–cough) have more complex instructions for creating a sourdough starter involving pineapple juice, and some authors just suggest leaving out some flour and water for a while. You can also buy dried starter online, or ask a local bakery (or a friend who bakes!) for some.

**If your sourdough starter has been languishing in the refrigerator for a while, like mine always has, you will need to revive it, starting 2 nights before you want bread. Take it out of the refrigerator, discard all but about 1/4 cup, and then add 1/2 cup of water and 2/3 cup of flour. Let it sit for at least 12 hours. Repeat, discarding all but about 1/4 cup, but this time add 1 cup of water and 1-1/3 cup of flour.

At least 12 hours before baking: combine your invigorated sourdough starter, whole wheat flour, bread flour, salt, and water in a large bowl, preferably with a lid. Mix until a loose, very wet dough is formed, and let it sit in a cool place (out on the counter next to a window, not in the refrigerator) overnight.

At least 2 hours before baking: Very generously flour a large cutting board. Turn the dough out from the bowl onto your floured surface. It will be very wet and sticky, and it won’t hold its shape. I usually turn the bowl upside down over the dough to keep it contained at this point. Let it sit 2 or 3 hours.

45 minutes before baking: Place your oven-safe pot and lid into the oven and heat oven to 450˚F. When the dough is ready, very carefully remove the pot from the oven, removing the lid. Very generously coat the bottom of the vessel with flour or cornmeal. Seriously, don’t skimp. Scrape, scoop, wrestle the wet and sticky dough into the heated pot. It’ll look like a hot mess, and that’s okay (rustic!). Cover the pot with the lid (be careful), and bake for 30 minutes. After that, remove the lid and bake for another 15 to 30 minutes, until the loaf is browned and sounds hollow when you knock on it.

If you want the loaf to maintain structural integrity, it’s better to wait as long as you can bear before cutting into it… but I wouldn’t judge you if you sliced into it right away.

Excuse me, did you know it’s 90 degrees in here?

Or, that time I tried heated yoga.

Doing yoga is one of those things I aspire to do regularly and occasionally end up caught overestimating the frequency of my “practice,” along with reading the news, going on dates, and washing my bedding and/or hair. I’ve been slightly better about the yoga recently, though I can’t really say the same about the other activities.

There is a separate conversation about yoga to be had, and I continue to have a lot of feelings about being a part of it all, and becoming a stereotype, and see-through yoga pants, but there’s obviously a whole mess of my own shit to work through before I can write about that coherently. I’ll leave it for now by saying that it’s been helpful in my 2015 quest of “self care” in both a physical and mental sense, so we’re forging ahead, though, thoughtfully.

One thing to keep in mind is that I’m just sort of bad at yoga. I’m not terribly flexible, and I have short limbs and a long torso, so hooking my arms around my toes or legs or even each other is a structural challenge. Imagine a gummy bear trying to scratch its ears, and you’ve got the general picture. It’s all fine, and I am pretty over never being a willowy person, but this is what I’m working with.

I’m trying to be more open to new experiences, so I signed up for a heated yoga class in a little local studio. My primary reasons were, “Why not?” and that I found a deal. Also I was intrigued by the prospect of wearing shorts, which I enjoy but don’t do often. Seriously.

I got to the studio and was immediately very pleased. I really like being very warm, given that it’s not humid. The room had this big heater blasting hot, dry air, and I settled down basically right in front of it. I watched other people fill in, making rows with our yoga mats, and I thought, “Maybe this is how cookies feel in the oven,” not unhappily. I started sweating immediately.

The class began, and it became obvious that it was significantly more advanced than was appropriate. Again, this is all fine, because they usually give beginner versions of everything, so I just worked through those and watched people float and contort on command. Maybe it was being in the presence of these crazy poses, or maybe it was mild heat stroke, but it felt awesome. I felt strong and stretchy and, mentally, somewhere in between confident and just not caring. There were definitely moments of physical discomfort, but it felt like just a part of the whole experience. It almost seemed so preposterously difficult that I didn’t need to feel self-conscious about struggling. At some point I heard the very recognizable sound of skin slapping on hardwood — someone had lost traction and essentially slip-n-sled off their mat. It happens.

I’m as surprised as anyone that heated yoga gets rave reviews from me. I went back to make sure it wasn’t a fluke, and I still mostly enjoyed myself. I aspire to one day be able to hold a low plank, but for now I just lie on my belly during that pose, which I am pretty okay at.

Egg on egg

0315_eggoneggtop
0315_eggoneggside

In addition to being bad at idioms, I’m also really bad at puns. I frequently don’t recognize when I’ve accidentally been punny myself, and I miss other people’s clever ones, too. I’m sorry, guys. I just barrel on through the sentence without stopping to think about it most often. For example, it took me drinking bottles of Honest Tea for actually several days until I caught on. I think I had to say it out loud, actually.

Side note, speaking of saying things out loud to realize what it sounds like, I suddenly remembered how fun Mad Gab is and wanted to blather on about it for a bit. It’s a game where one person says a series of words that doesn’t make any sense but sounds like a phrase, and others guess what the phrase is. My friend’s favorite example is “sand us on knee sway.” (Say it out loud.)

Okay, but back to puns. I’m more adept at punny food than punny language. I think I might have read on via BoingBoing, back when this post was alive in 2007, about a crazy restaurant that made spheres out of pea puree, basically remaking peas but with, you know, more flavor. “How fun and playful!” baby Jade thought, and then dismissed it as a weird Internet thing. Now, of course, molecular gastronomy is basically mainstream, so, lesson #1 – don’t listen to what I think is cool, and lesson #2 – we are allowed to play with our food again.

In the spirit of being playful without breaking the bank or needing to purchase strange chemicals (which I have done for Modernist Cuisine at Home cooking and recommend, if you are so inclined, but also understand if you are not), here’s a poached egg, resting on a roasted vegetable “egg.” It’s a good, simple meal even if you don’t have white plates or go to the trouble of plating, of course.

Egg on egg, or, poached egg with roasted vegetables

1 small or 1/2 medium butternut squash
1 small head of cauliflower
1/2 onion
1 or 2 tablespoons olive oil
1 or 2 teaspoons Chinese five spice
2 eggs
1 teaspoon vinegar (any type)
salt and pepper

Preheat oven to 375˚F.

Peel butternut squash, slice in half lengthwise, and scoop out seeds. Chop into small (1/2 inch or so) cubes. Break up the cauliflower into small florets. Slice the onion.

Toss the vegetables, oil, Chinese five spice, and salt and pepper to taste, and lay out on a baking sheet. Roast until the squash is tender, usually just under 30 minutes for me.

When the vegetables are nearly ready, poach the eggs. Bring a few inches of water to boil in a small but tall saucepan that has a cover. Add the vinegar to the water (helps break surface tension). When the water is boiling, turn the heat down so it’s just barely at a boil. Break one egg into a small bowl. Using a large spoon, spin the water swiftly, being careful not to splash, to create a whirlpool. Drop the egg in the center of the whirlpool, and immediately cover the saucepan and remove from heat. Wait for 5 minutes, resisting the urge to peek (I know). While you’re waiting, you can plate the vegetables. After 5 minutes has elapsed, scoop the egg out with a slotted spoon and place on the vegetables.

Repeat the process for your other egg and the remaining vegetables. Finish with more salt and pepper, if desired, and serve.