Miso Broiled Halibut

0627_misohalibut

Hello from the Midwest! I am on a whirlwind combined work and fun trip this week. I have a complicated eating itinerary for each city I’m hitting to help me and my stomach make the most of this trip. (It might be a little bit intense.) There are backup times to go to certain places if I don’t make it the first time. Everyone else also does their sightseeing largely with their stomach, right?

It feels a little weird to be editing photos and writing about my pretty unabashedly California-style food while still trying to digest foie gras meatballs (But actually. Worth it.), but here we are. Maybe looking at photos of leaves is a little bit like eating them? Let’s go with that.

Anyways, speaking of California and home, here’s another thing I’m into that totally screams Bay Area. I recently signed up with Real Good Fish, which means that, every other week, I get a portion of seafood that I know’s going to be high quality and that I know has been responsibly sourced. The only thing I don’t know is exactly what kind of seafood it is — at least, not until the day before. It’s a CSA-type model, but for seafood. I’ve been a faithful vegetable CSA member (via High Ground Organics) for a while now, and I’ve been delighted with the added surprise, delight, and challenge so far of adding a little seafood to the mix.

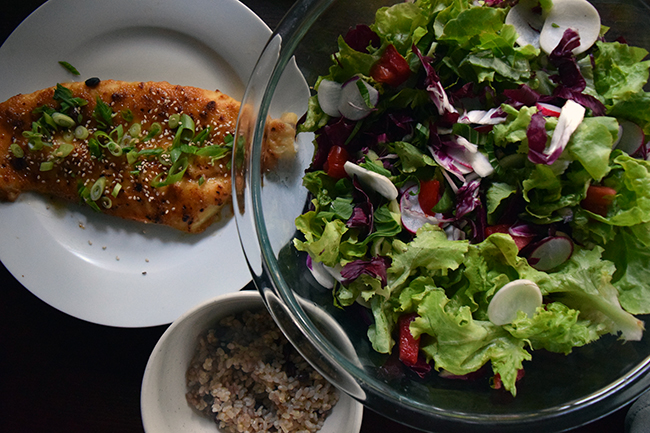
The first portion that we got was two huge fillets of halibut. I’ll admit, I was a little relieved that our first delivery was a bit of a softball. I signed up to get whole fish as a good learning opportunity. But since halibut are huge, they gave us fillets… definitely less intimidating. I went with a tried and true preparation in this spirit.

Broiled Miso Halibut

1 large halibut fillet (I used 1/2 lb or slightly more to feed 2)
2 tablespoons mirin
2 tablespoons miso paste
1 teaspoon grated ginger
1 scallion (optional)
1 teaspoon sesame seeds (optional)

Combine mirin, miso, and ginger in a large, flat pan (I used a cake tin). Gently rub the marinade into the halibut and place it in the pan. Let the fish marinade for around 20 minutes.

While you’re waiting, you can thinly slice the scallions and toast the sesame seeds. I also made a quick side salad (butter lettuce, radicchio, sliced turnips, tomatoes with a simple shallot & Dijon mustard vinaigrette) to go with the meal.

Place an oven rack at the top of your oven and turn your broiler to high. Carefully slide the fish onto a parchment-lined roasting pan, rubbing in any leftover marinade. Slip it onto the rack close to the broiler. Let it broil, undisturbed, for 10 minutes for every inch of the thickest part of the fillet. The miso will bubble and caramelize slightly.

(If you’re worried, you can check the internal temperature, which is technically 145˚, but if you get to 135˚, you should be good, as the temperature will continue rising after removing it from the oven.)

Top with scallions and sesame seeds, and serve.

Bowl and Spoon by Sara and Hugh Forte – Cookbook Review

0627_bowlspooncover
0627_bowlspoonquinoa
0627_bowlspooncarrots

Reading the chatter online about this second cookbook from the Sprouted Kitchen team, Bowl and Spoon, has been really affirming for me, despite not having contributed one crumb to this lovely book. It’s really been great mainly because everyone chimes in about how much we all like eating from bowls. I’m not alone! In fact, there are dozens of us!

But seriously. Bowls. You can hold it in one hand, shovel with the other, and reasonably eat on the sofa. What else could you want? The book’s schtick is “bowl food,” and while the definition of that is stretched a bit (I mean, anything is bowl food if you want it enough), it’s a nice homey aesthetic. There isn’t any alchemy in this book — no warping of kale into cupcakes or anything — but that’s kind of the point, I think. It presents straightforward but fresh recipes using wholesome ingredients that don’t try to be something they are not.

Other than an appreciation for the best food vessel, I also resonate with Bowl and Spoon‘s celebration of salad. I know that sounds super lame and sad, and it’s a total 180˚ turn from my stance a few years ago of, “No salad as a meal.” I don’t know, I’m old now, and my body wants vegetables, and also, I now know what I want as a meal salad. It’s got to have two of the three: hearty greens, something warm, and some whole grains or legumes. (Please don’t feed me a side salad as a meal.) Sara Forte understands this, and this book’s got a bunch of filling but fresh salads I’d happily enjoy as a meal.

I prepared two of these: the Summer Quinoa Salad, and the Marrakesh Carrots. They were both salads to savor with great flavors and a variety of texture. They take a little more time to throw together than a quick side salad, but honestly, on two consecutive hot days, I happily ate a double portion of one, and then the other, as my dinner. They also kept well in the fridge for a few days. When you find a salad that’s a satisfying meal and also doesn’t totally die in the fridge, you hold on and never let go, you guys.

I received this book from Blogging for Books in return for my honest review.

Cherry Chocolate Pie

0609_smallcherryinhand
0612_choccherrywhole

Upon baking my very first cherry pie (the little one, pictured above), I got very excited and sent the photo to a friend saying, “This is the most American thing I’ve ever done.” And then, because I still can’t leave well enough alone, I immediately started dreaming up how I’d change it. Sorry, USA. But, hey, I added chocolate. So, not sorry?

I’ve thought a lot about pie crust. And I want all of our pies to have lovely, crisp bottom crusts. Could I give that as a blessing for a baby, if I were a fairy? “And may your pie crusts always stay crisp!” But seriously, all that work to perfect a flaky crust — let’s try to protect it from the wet fruit filling.

The answer, I found, like the answer to many things, is chocolate. In addition to an egg wash, these bottom crusts get brushed with a thin layer of ganache, which has the dual honors in this recipe of being chocolate and being structurally useful. You go, chocolate ganache!

0516_choccherrypieanim_slower0612_choccherrycut

Cherry Chocolate Pie

For the crust:
1 double crust (I like this recipe)
1 egg

For the ganache:
2 tablespoons heavy cream
2 oz bittersweet chocolate

3 to 4 cups of cherries, pitted (or frozen)
1 or 2 tablespoons granulated sugar
juice from ½ lemon
1 tablespoon quick-cooking tapioca

Preheat oven to 400˚F.

First, prepare the bottom crust:
Roll out one of the crusts onto a pie pan, returning the other crust to the refrigerator for the time being. Blind bake, covered with foil and pie weights/dried beans for 15 minutes. While crust is baking, beat the egg in a small bowl.

Remove the crust from the oven, removing the foil and pie weights, and brush with egg. (You can save the rest of the beaten egg to brush the top crust, later.) Return to oven, uncovered, for one or two minutes, just to let the egg set. This will help the bottom crust remain crisp when the pie is filled.

Allow the pie crust to cool. Place the baked pie crust in the refrigerator or freezer to chill.

Then, make the ganache:
In a small saucepan over low heat, combine the cream and chocolate. Stir slowly until the chocolate has melted and the ganache is smooth. Use a spoon to spread the ganache in a thin, even layer over the chilled, baked pie crust. The ganache layer (aside from being delicious chocolate) also helps keep the bottom crust crisp. Pop the pie pan back in the refrigerator (or freezer) to allow the ganache to set. Your baked and ganache-d bottom crust can be prepared up to a day in advance of assembling the rest of the pie.

Assemble the pie:
If not already hot, preheat oven to 400˚F.

Combine cherries, sugar (use if cherries are not at peak sweetness), lemon juice, and tapioca in a bowl. Let the filling sit for a few minutes.

Roll out the top crust, cutting into eight 1-inch strips. Place the strips in the refrigerator to allow them to return to a cool temperature.

Dump the cherry filling into the prepped bottom crust with ganache.

Working quickly, weave the strips on top of the pie, 4 going each direction. Use your fingers to crimp or otherwise attach the strips to the sides of the pie.

Brush generously with the remaining beaten egg.

Bake for 45 minutes or so, until the top of the pie is browned and the filling is bubbling aggressively. If the pie is browning too quickly, lightly cover with a foil tent. I’ve found that the edges of the pie, in particular, may need to be covered with foil to avoid browning too much.

Allow the pie to cool to room temperature, and cut and serve.

This is the last post in my series on how to make pies for a wedding! Part 1 has tips on preparation, and part 2 has tips on making the pies.

0609_butterbeatseverything

How to Make Pie for a Wedding, Pt 2

0609_justprodpies
0609_prodpieschoc

0609_prodpiescrusts

When I last left you, I was making very bad pie puns. I’m sorry to say that this will continue, though at least we are actually making the pies this time around.

Though I obviously had a lot of serious pre-pie-ration thoughts, the beginning of making the actual pies was a bit unplanned, for me. Having purchased a carton of buttermilk to test out a pie dough recipe a few days earlier, I realized that most of the carton would expire and go to waste by the end of the week. For some reason, I decided that I could not use it for anything but pie dough. Thus began the several-day saga in which I made 14 pie crusts, which, since unplanned, had to occur in parallel with a SQL class I was taking. I also had recently purchased a rolling pin (remember, I used to use a Campari bottle), so I may have terrified a UPS delivery person with my manic enthusiasm upon arriving at my apartment. I may have also opened all the windows in our apartment to keep the temperature cool enough to coddle temperamental butter. So, I may have temporarily lost my mind, but I have learnings. And, really, truly, after the few days of crust daze, the pie-making was all quite pleasant.

Tips on Making Pie for a Wedding, Pt 2
This time, we actually make the pie.

  • Okay, I mean, it should go without saying, but don’t succumb to pie-mania like I did and let a carton of buttermilk control your life for a few days.
  • But seriously, let’s talk crust-making. If you’ve made a pie crust from scratch, you’ve probably heard the mix of science and weird mystic kitchen knowledge about pie dough and the importance of keeping it cold. It’s true, and it can be a bit tough, especially when making a large batch of dough. But, don’t panic, because even “bad” pie dough is good. You can’t go wrong with fat and flour, so, seriously, it’ll be okay! For keeping the cool temperature, opening all the windows in your apartment might be a bit extreme. I think working quickly and confidently, and having chilled all my implements (bowls, tools, etc) were effective.
  • And now, let’s talk about crust-baking. With disposable pie tins, it can be challenging to get a pie’s bottom crust to crisp up. I found it the most helpful to parbake/blind bake the crusts with some extra thermal mass below the tins, covered in foil and pie weights. I have a baking steel, but I believe doubling up the pie tins would also help. The pies were going to sit for a day, so for extra protection against soggy crust, I also egg-washed the bottom crusts. To egg wash, brush egg on the crust after the blind bake (remove the foil first, of course), and then pop it back in the oven for a minute, just to set the egg.

0609_berryprep
0609_berrydone

  • For thickening a fruit filling, I found that I liked quick-cooking tapioca the best. And, without fail, I needed to cover the edges of a pie with foil to keep them from browning too much during baking, so now I just do that straightaway.
  • I also learned that pie dough scraps, just baked, make dangerously delicious “pie crackers.”
  • Pies can sit out about a day and be totally fine. To minimize time sitting out but also minimize the amount of baking I’d be doing during wedding festivities, I blind baked/egg washed the bottom crusts for the pies two days before the wedding at home. I brought a cooler filled with crusts, unbaked dough for top crusts, and fillings to the wedding location, and then finished the pies the day before. This left me with just garnish and assembling the fresh fruit pie the day of.
  • Whatever the pie version of mise en place is called, it’s A+. Since I was traveling to bake, it made my life a lot easier in an unfamiliar kitchen to have my pie fillings, garnishes, and such pre-mixed and ready to go. This also made me feel like a Food Network personality when I got to pull out tubs and bags of things while saying, to nobody in particular, “I prepared this earlier…”

0609_dayofprep

0609_pdxwithbri

  • Have an amazing accom-pie-ce! Seriously, talking pie-nutia (minutia… that’s a bad one) with this lovely lady, who banged out 18 incredible pies, was amazing. You da best.

Enough with the extremely detailed talk about crust and heat mass… what pies did I end up making? I made slightly adapted versions of four tried and trusted recipes, and I cobbled (hah!) together my own for my fruit lattice pie, which I’ll post next!

0614_piemasterapron
This amazing apron courtesy my now married (!!) friends; thanks, loves! I feel truly unstoppable wearing it. And thanks to roomie4life SXN and blogger BFF Kim for a couple of the photos!

This is the second post in my series on how to make pies for a wedding! Part 1 has tips on preparation, and part 3 (coming soon) has a recipe I developed for Cherry Chocolate Pie.

How to Make Pie for a Wedding, Pt 1

0609_minisandstrawb
0609_prodpiespb

Woman wakes with a start the night before the wedding and runs to her car in pajamas and a coat — too classic, right? Well, the woman was me, and, no, I’m not married. But, alongside a Portland-based Pie Master, I did recently bake lots pies for two of my closest friends’ wedding. And, if you’re wondering, that night, I woke up realizing I’d forgotten to chill coconut cream so ran to my car to grab it. “Crisis” averted.

No, but seriously, homemade pies matched up with the casual, intimate, backyard bash feel of their beautiful celebration (I shed some serious tears, you guys). I was honored and pleased to be able to contribute to this big event for my friends in what felt like a really special, meaningful way — so much more satisfying than buying some towels off a registry, right? And also, pie.

I hear wedding pie is a thing, now? So, some tips from my personal pie passage. In multiple parts, because I have a lot of thoughts about pie and pictures of pie. Pie pie pie.

Tips on Making Pie for a Wedding, Part 1
Pre-pie-ration. Pie Prep. What you do before.

  • Take some time to find your piesthetic. I wouldn’t have considered myself a pie-baker a few months ago. I’d made a few, mostly savory ones, but I didn’t have a good feel for it, yet. I started with these two that I’d made before: Fresh Strawberry and Mascarpone Pie from Epicurious and Chocolate and Espresso Pie from Oh She Glows (via My New Roots) and went from there. Side benefit, I have become significantly more well-liked, since I brought a test pie to nearly every social event I went to for months. Lest you think I made a truly superhuman amount of pie, I actually am just not that social. I did make a fair amount of pie, though.
  • But don’t make cupcake-sized pies. Seriously, don’t. I did it so you don’t have to. They are adorable, but latticing them is incredibly tedious and frustrating, and you don’t even get very good data from making them. They’re somewhat useful to generally test a recipe, but the physics of a normal-sized pie differ so much that any information on timing or taste is not valuable. Unless you are making cupcake-sized pies for a wedding, in which case, damn.

0609_minisintin0609_littlepies
No. I know you’re thinking it. Don’t go there.

  • Figure out your crust plan early. The flaky, buttery crust is my favorite part of pie (obviously), so I wanted to master it early. It also freezes well, so you can make it early. I settled on this buttermilk pie crust from Joy the Baker. It baked up with so many layers that people mistook it for puff pastry, which I took as the highest compliment. I also tried the famous vodka pie dough, but I didn’t find great success.
  • Do your pie math.  We figured we’d get 8 slices per pie and that each guest would, on average, have 2 slices. And, of course, we added a few bonus pies on top of that, because I will always be that person who worries that there’s not enough to eat.
  • When planning your menu, leverage freezer-friendly pies. Of course, you will make fruit pies with beautiful lattices. But don’t forget about pies like peanut butter or chocolate, which are quicker to make and freeze well. In addition to a few chocolate and espresso pies, I also made a couple Peanut Butter Cream Pies from Homemade Decadence (via The Candid Appetite). It was a relief to be able to make these well ahead of time so that closer to the wedding, I could focus (some might say obsess) over the moisture content of fruit pies and crust crispness.

0609_minipbprep
0609_minipbsliced

  • Plan out your pie-meline. It’s totally dorky in the best way. Here’s what worked for me. Just over a month out, I made all the crusts. It was sort of an intense day (more on that later), but it was great to have them done, plus a few extras for testing. A week out, I made the freezer-friendly pies. Two days before the wedding, I baked up the bottom crusts for the fruit pies. The day before the wedding, I finished baking the fruit pies. Day of, I only had finishing touches like whipped cream. Excruciating detail on all of this next post.

Next up, making of the pies!

This is the first post in my series on how to make pies for a wedding! Part 2 (coming soon) has tips on making the pies, and part 3 (coming soon) has a recipe I developed for Cherry Chocolate Pie.