Fennel rings

Skipping through a mighty backlog of photos and notes to tell you guys about something I made last week, because… it was fennel rings. And I need to share them with the world.

We got 3 big bulbs of fennel in our last CSA box, and I was getting tired of fennel in salad, so I decided… deep fry. I was really pleased with the result, and I think I might do this with little scraps of fennel from now on.

Solution to CSA box slump.

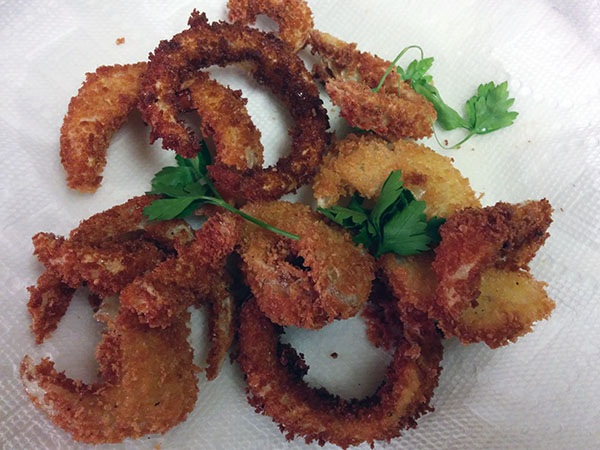
Fennel rings! They’re like onion rings, but a little sturdier, which means more dipping sauce, which is only a positive in my world. The fennel flavor is pretty mild, but if you’re paying attention, you can taste it. And, I mean, there’s no guilt associated with eating fennel rings. It’s seasonal.

Fennel Rings

1 bulb of fennel
1/2 – 1 cup of all-purpose flour
1/2 – 1 cup of panko (or normal breadcrumbs)
1 egg, beaten
1 cup or more of vegetable oil
salt and pepper

Slice fennel into rings or parentheses shapes, between 1/4 inch and 1/2 inch thick, depending on how you prefer your fried things.

Pour out a pile of flour, a pile of panko, and a bowl with your beaten egg. Season the salt and panko with a little salt and pepper.

Dredging makes me feel like a real cook.

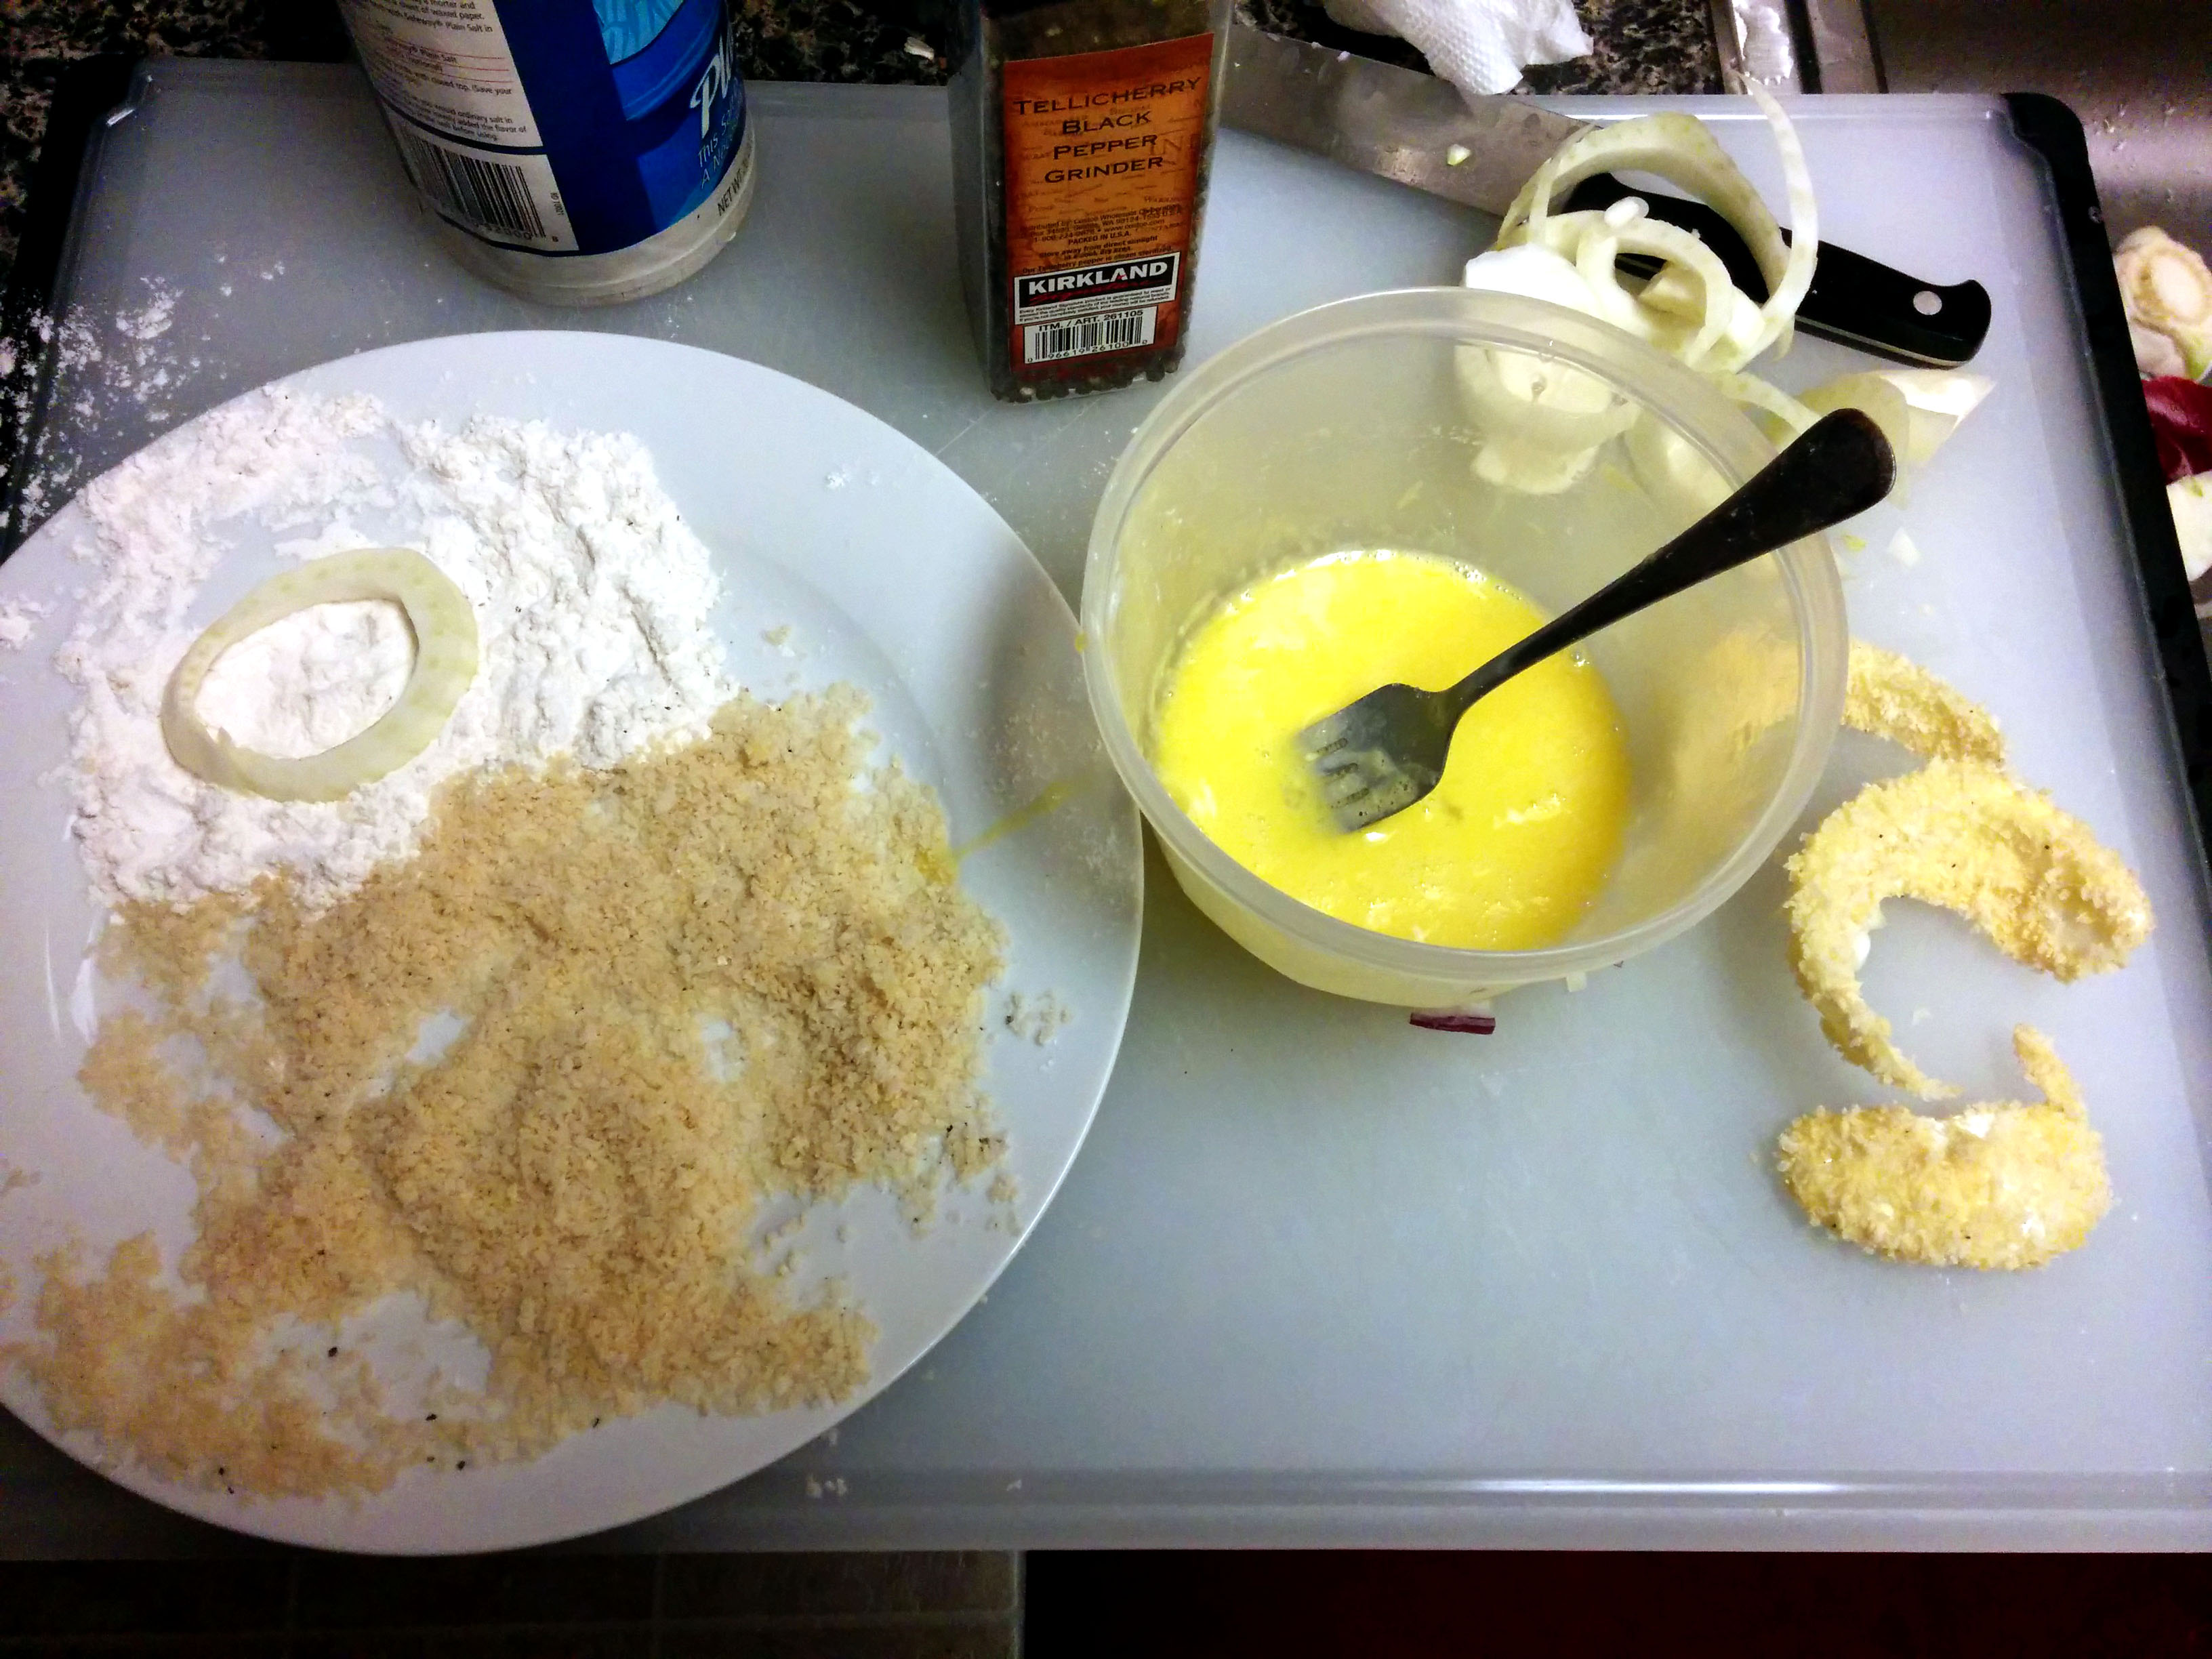
Time for dredging! The basic goal is to coat each piece with flour, then egg, then the breadcrumbs/panko. There are a few strategies — some people like to coat all the pieces in one thing at once, then move on, sometimes employing Ziploc bags or such. I usually do the pieces one by one — rolling it around in flour, then dropping it in the egg, then rolling it around the panko.

Heat up oil in a small saucepan with high edges to catch splatters. There should be enough oil that one layer of fennel rings could be totally submerged. The oil needs to be quite hot when it’s ready. You can test by flicking some flour into the oil, and if it sizzles immediately, it’s hot enough.

Ah, home deep frying. This made our apartment smell like fish tacos.

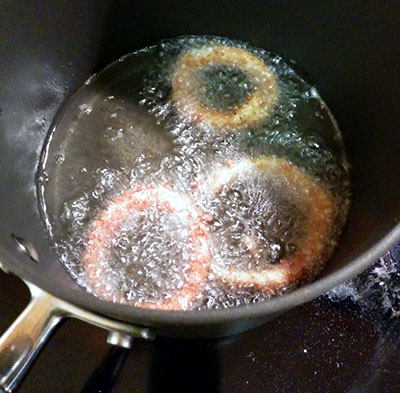
Slide a few pieces into the hot oil, but be sure that they aren’t touching or overlapping. (Fewer pieces is better than too many.) Let them fry for a minute or so. When you’re satisfied with the browning on the bottom, flip them over, and let them finish.

Remove from oil (carefully) with a slotted spoon onto a drying rack of plate with paper towels. Continue until you’re done with the batch.

Serve immediately with your favorite dipping sauce (BBQ sauce? aioli?).

The realest spinach salad and cheese pretzel

In today’s edition of food blogging foods that oughtn’t be food blogged, we have a spinach salad and cheese pretzel from Esther’s German Bakery.

Wait, though.

Looks innocuous enough...
Looks innocuous enough…

We have spinach, tomatoes, yellow pepper, and some roasted potatoes from last week.

I’m both proud and slightly embarrassed to share that for salad dressing, I used the leftover garlicky oil in the tupperware that held those potatoes and mixed it up with some red wine vinegar, salt, and pepper. It was good, but, I’m pretty sure I won’t be winning any awards for recommending that little tip.

And, yeah, I did eat off the end of the cheese pretzel before even returning home. What.

Soba salad with soy-ginger dressing

0925_sobasalad

Longtime (hah) readers (hi, Mom) will note that this “salad” is very, very similar to the spring roll salad I posted in September. And, yes. I love a salad that has noodles and a soy saucey dressing. Yum.

Soba Salad with Soy-ginger Dressing
Inspired by Smitten Kitchen

1 small serving soba noodles
1 or 2 playing-card sized slices of extra firm tofu
1 Persian cucumber
1 carrot
2-3 radishes
a few handfuls of salad greens, washed
1 small knob ginger
1 tablespoon soy sauce
1 teaspoon sesame oil
1-2 teaspoons honey
1 tablespoon lemon or lime juice
1 or 2 stalks scallion
olive or vegetable oil.

Boil the soba noodles according to package directions — usually just for a few minutes. Once the noodles are boiled, drain and rinse with cold water immediately to stop cooking. While waiting for the noodles to cook, you can prep the rest of the salad.

Heat a bit of vegetable oil in a pan and fry the tofu until brown and slightly crisp.

Grate the carrot and radish. Slice the cucumbers into matchsticks. Thinly slice scallions. Arrange the greens into a large bowl and top with the cut vegetables, except for the scallions, and tofu.

Grate the ginger, and mix with soy sauce, sesame oil, honey, lemon/lime juice, and olive/vegetable oil to taste.

Once noodles are done, arrange on salad and sprinkle the entire thing with scallions. Drizzle in dressing and serve immediately.

Brown Butter Chocolate Chip Cookies

Cookie stack.
Cookie stack.

I imagine I’m not alone in this, but sometimes I can get a little bit (a lot) obsessive about specific foods. I’m talking about making them again and again until I’ve “perfected” the recipe and technique. I don’t generally like eating repeats, so this behavior’s a bit odd for me, but it certainly happens from time to time. One perennial obsession is finding the perfect chocolate chip cookie. I still want to do some testing with this (parchment vs Silpat is the biggest question here), but I’ve made them now enough times to be confident that they are very good chocolate chip cookies.

They are, of course, from The Food Lab at Serious Eats, where Kenji indulges food obsession and documents his recipe testing with satisfying depth and detail. He’s decided this is the best recipe for his preferences, though, I have some soul searching to do yet, so I’ve renamed it.

I’m still working out details for this blog like how to represent measurements. When cooking, as is probably apparent, I rarely use measuring cups, etc and cook by feel instead, though I have been doing my best to quantify the “feels right” amount for writing here. For baking (other than bread), though, I’m fastidious and usually use a kitchen scale. So these measurements will be in weights, though I’ll also provide volume estimations.

0908_bestchocchip03

Brown Butter Chocolate Chip Cookies
From Serious Eats

2 sticks (8 oz) unsalted butter
1 small ice cube
10 oz (2 cups) all-purpose flour
3/4 teaspoon baking soda
2 teaspoons kosher salt
5 oz (3/4 cup) granulated sugar
2 eggs
2 teaspoons vanilla extract
5 oz (1/2 cup + 2 tablespoons) packed brown sugar
8 oz (2 bars, usually) semi-sweet chocolate, chopped by hand into 1/2 to 1/4 inch pieces
coarse salt (I’d use Maldon but didn’t have it the day I photographed.)

0908_bestchocchip02

Melt butter in a small saucepan over medium heat, whisking constantly as it cooks. Once particles begin to turn golden brown and smell nutty (this is after the foamy phase), take the pan off the heat immediately and swirl for a few more seconds, until the butter is a deeper brown (but not black). Transfer to a bowl and whisk in the ice cube to replenish moisture and halt the cooking. Place the bowl in the refrigerator to cool.

Place granulated sugar, eggs, and vanilla in a large bowl and beat until the mixture is combined and pale, with an electric mixer if possible. Add in brown sugar and brown butter, then mix until combined.

Add flour, baking soda, and salt, and mix by hand, careful not to overwork, but also taking care to not leave lumps of any one dry ingredient. Add chocolate pieces and mix gently to incorporate.

Cover and refrigerate at least overnight and up to 3 days.

When ready to bake, preheat oven to 325 degrees Fahrenheit. Line a baking sheet or two with parchment or a silicon mat. Parchment tends to yield slightly flatter cookies, while a silicon mat will yield thicker cookies, from what I can tell. Roll dough loosely into balls between the size of a walnut and a ping pong ball, spacing on the baking sheet with at least an inch between them. I usually try to then tear apart the balls a little so the cookie surfaces end up more uneven.

Bake until the edges are brown, 13 to 16 minutes, rotating the pans if necessary.

While cookies are hot, sprinkle coarse salt on their tops. I used normal salt the day I photographed because I’d run out of coarse, and it wasn’t as good… but still pretty tasty. Remove from the pan and let cool.

0908_bestchocchip05

One-pan farro with tomatoes

0902_onepanfarro03

I’m very devoted to one-pan meals. I love cooking (and eating), but I really don’t love doing dishes, so if I can save on a dish, I will. And this is a true one-pan meal. None of that BS with washing the pan in the middle of cooking. That doesn’t count as saving on dishes, if you have to wash the same one twice. Or using a lid as a plate. Don’t try to be smart with me. Washing a lid still counts. With this recipe, you just dirty one pot, a cutting board, a knife, a measuring cup, and maybe a grater. Yes, please.

Oh, also, it’s delicious.

One-pan Farro with Tomatoes
From Smitten Kitchen

1 cup farro
2 cups water
1/2 large onion (yellow or white)
2-3 cloves of garlic
9 oz cherry tomatoes (about one of those green baskets, heaping)
1 teaspoon salt
generous pinch of crushed red pepper flakes
1 tablespoon olive oil
small handful of basil leaves
Parmesan cheese, grated (optional)

Just throwing everything into the pan as it's chopped. So good.
Just throwing everything into the pan as it’s chopped. So good.

Place water and farro in a medium saucepan, and let the farro soak while you prepare the other ingredients.

Very thinly slice the onion into half moons. Mince the garlic and slice the cherry tomatoes in half. Add everything to the pan. Add salt, red pepper flakes, and olive oil to the pan. Bring everything in the pan to a boil, then lower to a simmer, cooking uncovered for around 30 minutes. Stir occasionally. When done, the farro is tender but still toothsome, and nearly all the water is absorbed. (Add additional water while cooking if needed.)

Slice the basil leaves into thin ribbons (chiffonade). Stir them into the done farro, and sprinkle with cheese if desired. Serve hot, though, it makes excellent warmed up leftovers as well!

This technically serves "2 to 4," but I can definitely eat most of the recipe.
This technically serves “2 to 4,” but I can definitely eat most of the recipe.

I’m on the lookout for more true one-pan recipes (none of the nonsense I described earlier in this post), so please send them if you’ve got ’em!